Whenever I teach a scratchboard art lesson, it is always one of my students’ favorites. Here’s why they love it and how I teach it.
Why students love the scratchboard art lesson
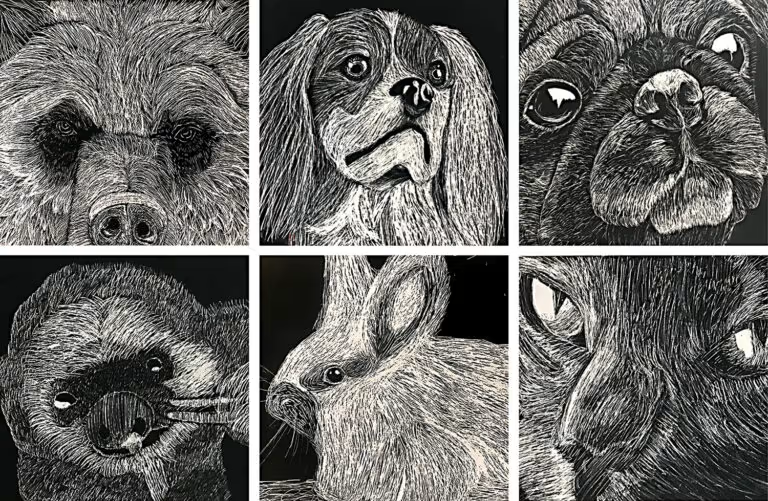
One of the biggest reasons my students like this lesson is because it is something they cannot do at home. Some students have done Scratch Art before, but this experience is 20 times better. Scratchboard is a very fine layer of kaolin spread onto a surface (either hardboard or paper) and coated with ink. The details students can achieve with the scratch tool on scratchboard closely resembles engravings and woodcuts! My students are always very proud of their results and impressed with their final outcome.

Subject matter
I prefer to do this lesson with animals, because animals have texture that is visible and easy for students to see. To provide my students with a variety of animals to choose from, I found about 100 close up animal photos picturing everything from birds, cats, fish to reptiles. I cropped and scaled each photo to be 5.5” x 8.5”.
I print the images, make photocopy sets for my classes and keep the original printed images in a hanging file to copy the next time I use the lesson. My lesson plan including the 100 images is available to buy for anyone looking for ready to go animal images.
Scratchboard art lesson objectives
In this lesson, students will learn about and utilize stippling, hatching, and cross-hatching techniques as well as create a value scale and the illusion of a 3D form.
Students learn how to use a chalk transfer technique to draw an animal in the direct proportions as the original photograph. Students also learn how to create implied texture using mark making techniques with the scratch tool.

Where to purchase the supplies
I purchased a scratchboard kit from a common art supply vendor. This was costly at first, but now that I have the tool handles and blades, I only have to buy the scratchboards when I want to teach this lesson. I buy 24” x 36” pieces of scratchboard and cut them into 5.5” x 8.5” pieces to save money. This size is perfect for the images I scaled and the chalk transfer method I use.
How I teach the lesson
Prior to starting the final scratchboard students experiment with the scratch tool and scratchboard. I use a 2” x 2” pumpkin line drawing and photocopy an image for each student. We use 3” x 3” scratchboard scraps for this practice. I show them how to add chalk to the back of the photocopied image, tape it to the scratchboard and then trace the line drawing to transfer a chalk drawing onto the scratchboard. The chalk works great because it is easy to wipe off if necessary. The students then practice making the line drawing look like a 3D form by adding hatching, stippling or cross-hatching where the highlights would be. You can check out my YouTube video detailing the process below.
After the students practice they show me their work and choose their animal. The students then use the chalk transfer method to trace the animal onto their scratchboard. I encourage my students to trace value changes, contour lines, and patterns. It is better to trace more than less.
Tips for success
Before they begin scratching we look at student examples and critique their work. We look at the length of the hair/fur, the direction of fur, how value ranges are created using line weight and spacing and how to make an implied line. Once the students begin scratching their final copy, I remind them not to outline, because it seems instinctive to trace the chalk line. Instead, I encourage them to use it as a guide and make an implied line with marks and lines to represent the fur texture. I also encourage them to keep the reference photo next to their work and study it while they are working.
Lastly, I recommend working from the bottom of the scratchboard to the top to prevent smudging or erasing the chalk drawing. Students spend 3-4 days on their final drawing. Students are 100% engaged and the results of this lesson always AMAZE me!
If you are interested in the lesson including the 100 ready to print images click here.
Thank you for reading! – Trista
Check out my Student Favorites Page for more posts like this.
If you liked this scratchboard art lesson post, please subscribe by clicking here.