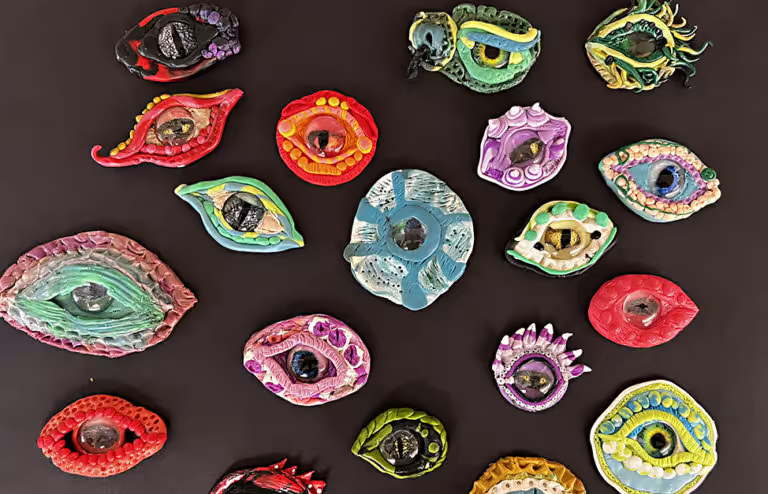
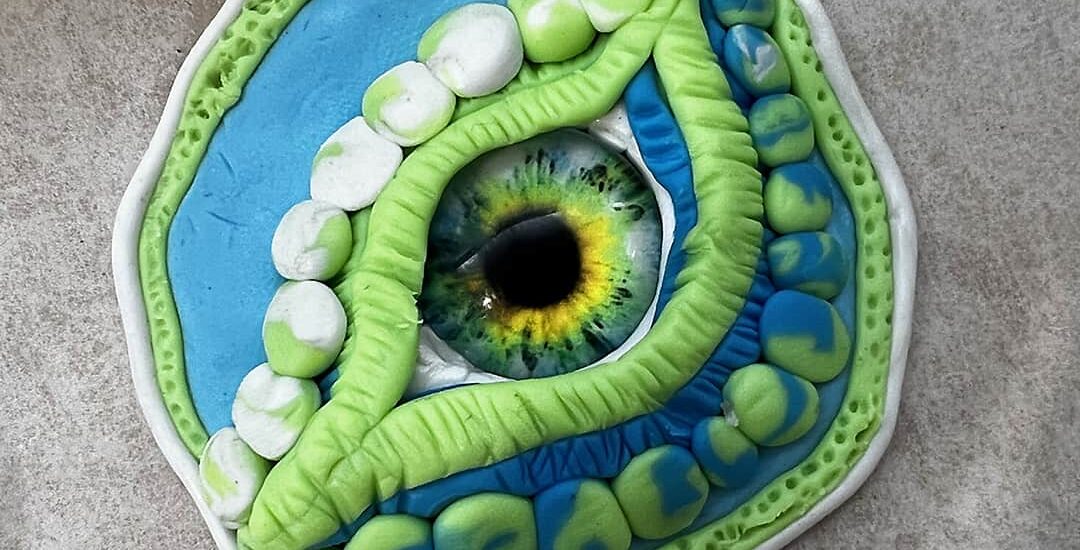
For the past few years I have taught an oil pastel dragon eye lesson to my 6th grade students. My kiddos always love the lesson so much that this year, I decided to add a polymer clay dragon eyes lesson. I ordered the supplies from Amazon and created some dragon eyes of my own. I brought my examples to school and my students were begging to make them! Here are some tips, tricks and suggestions for making your own clay dragon eyes.
Day 1: Clay Dragon Eye Preparation
During the first class period we discuss the differences between tactile and implied texture. Next, the students preview the Clay Dragon Eye – Art With Trista YouTube video tutorial.
Finally we view student examples. The students analyze color schemes, clay building techniques and the creation of tactile texture. The students use the rest of class to plan their dragon eye. I require a full sketch of their dragon eye including color and clay techniques before they start.

I project a PowerPoint slide of the planning steps on the board for the students’ reference. These steps include: making a complete sketch of the eye, planning how to make tactile texture, and planning what colors will be used.
As the students finish their sketch they line up at my desk and chose their glass eye and three pieces of clay. I pre-cut the clay blocks into fourths with an X-Acto knife. Then I organize them in an egg carton by color families.

The students move quickly through the line. They get plastic clay tools, texture rubbing plates and a small piece of parchment paper to work on. Students write their name and period number on the parchment paper.
Day 2: Creating the Dragon Eyes
The next class period, students get their supplies from their storage shelves and continue to sculpt. I play the video tutorial once again and project the creating steps on the board. I also suggest trading extra clay with classmates. This way they can use more than three colors.
I suggest that students use their clay knife and trim the base shape if they need more clay. All extra clay is returned to me once they are finished with their dragon eye. I recycle the used clay and mix it until it becomes a new color! As the students finish, they place their dragon eye on a cookie sheet to be baked. I use an oven we have at school in the culinary department. In the past, I have been granted permission to use the oven in the cafeteria. It never hurts to ask. They bake for 30 minutes at a low temperature of 275 degrees.
My Complete Clay Dragon Eye Lesson Plan is available here.
My students have the option of making the dragon eye into a pin, magnet or leave it as is. It is a quick 2 period project for us. I have 45 minute classes. The students love it because everyone is successful. Plus, some students enjoy creating a sculpted version of the Oil Pastel Dragon Eye they made previously.
For more on making oil pastel dragon eyes, read my “Dragon Eye Art Lesson – A Student Favorite” blog post.
Thanks for reading – Trista
If you liked this clay dragon eyes post, please subscribe by clicking here.
Check out my How To Page for more posts like this.
Related Post: How I Survive Clay Day
Related Post: 5 Fun Ceramics Art Lesson Ideas
To Make Oil Pastel Dragon Eyes instead of clay: Dragon Eye Art Lesson: A Student Favorite