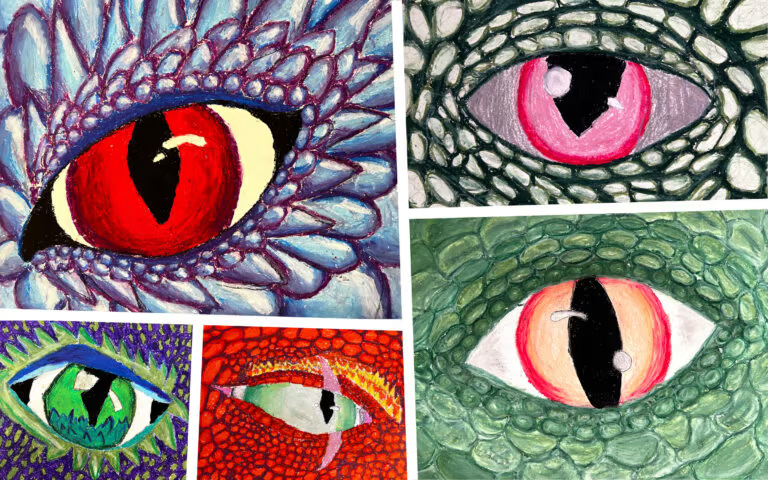
The Dragon Eye art lesson has been a constant student favorite in my art room for a while now. It has an exciting subject matter, fun medium and plenty of room for personal expression and creativity! Here’s why I think students like it so much and how I teach it.
What the Students Learn
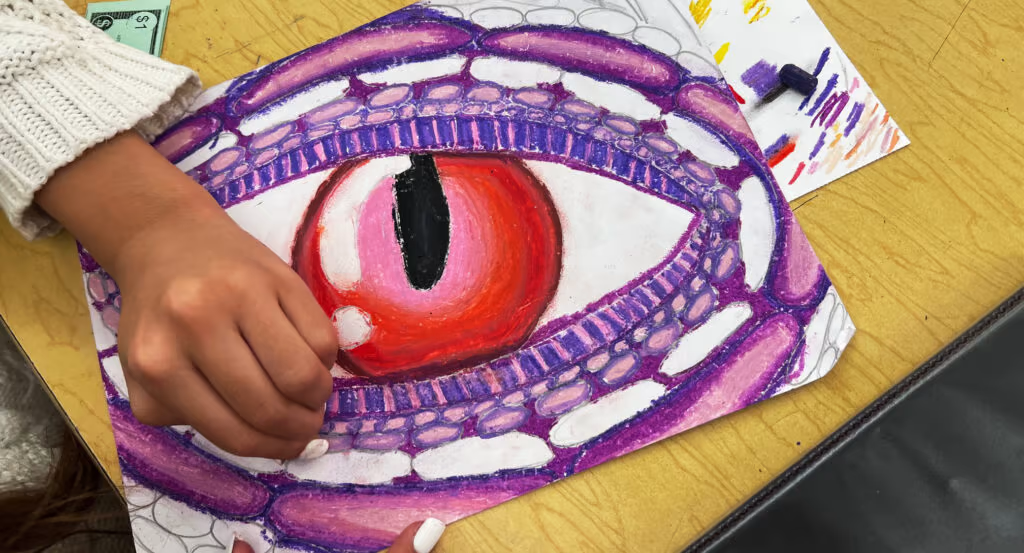
The lesson objectives include using oil pastels to draw a realistic eye. Students use reference photos to examine animal eyes and learn the parts of the eye. The students also learn the difference between tactile and implied textures. My students learn how to use tints and shades of a color to create shadows and highlights. They apply oil pastel techniques to their artwork to achieve these value changes.
Why Students Love It
I think one of the biggest reasons student love the dragon eye art lesson is the unique subject matter. Who doesn’t love dragons? Dragons are mystical and magical. Creating a fictional character is imaginative and engaging because the results can have a personal connection. I’ve had students create water dragons, fire dragons, ice dragons, a Spiderman dragon, and an Anime inspired dragon. This challenging lesson provides individuality and creative thinking. The results of this lesson is increased effort, hard-work and pride in their finished masterpiece.
Using Oil Pastels
Another reason I think the dragon eye art lesson is a student favorite is because it has a high success rate and gives students a successful oil pastel experience. I show them how to use a white or light oil pastel to make a smooth transition from one value to another. In addition, I show them how you can also create a smooth texture by using a finger, paper towel or baby oil to blend the colors. I also stress the differences between using a chunky oil pastels and pencil. Detail is easily obtainable with a pencil, while oil pastels are not ideal for detail work. Therefore, we save detail work for the end. Defining lines and textures should be the icing on the cake.
They look like crayons, but the potential is so much greater than just filling in an area with color. I teach my students to layer the oil pastels and blend colors together. Students start with the lightest color as the base color and find a medium and darker color to blend toward the edges of the shape. After this lesson, many students tell me they have oil pastels at home, but they didn’t know how to use them.
How I Teach The Dragon Eye Art Lesson
I print several images of close-up animal eyes for reference, everything from alligator to elephant eyes. I teach my students the parts of the eye and the students analyze the differences in the sclera, pupil shapes, eye lids, and eye lashes. Then I have students make three thumbnail sketches of creative eyes. I have a step-by-step handout students use to begin working independently. I encourage students to borrow ideas from a variety of animals or add their own personal interests. For example, the pupil can be the shape of lightning or flames, because after all, this is a fictional creature and the sky is the limit!
Next, they begin lightly sketching their composition onto drawing paper. For the eye shape, my students trace lids with about a 5” diameter to create emphasis on the eye. I show them how to draw lines over the top and bottom to create an overlapping eye lid. The drawing includes: sclera, iris, pupil, highlight/glare, eyelid, eyelashes, and scales. The final step is layering oil pastels in each scale with a light, medium and dark oil pastel to give it a 3D illusion. The same technique is applied to the sclera to create depth. All of these steps and techniques are demonstrated in my video tutorial, which I show during class as a visual reminder of the techniques. Here is the video tutorial I use, if you are interested in using it with your students.
Finally, I like to make a connection to a well-known artist, culture or art career with every lesson I teach my students. For this lesson, my students learn about Johannes Vermeer and how he used a strong light source and his work. We critique “The Girl With the Pearl Earring” and look at how he used shadows and highlights to create implied texture in the painting. My complete Oil Pastel Dragon Eye Lesson Plan is available here.
What Students Learn
This lesson is packed with standards, art techniques, an exciting medium and art vocabulary. Students learn how to create an artwork requiring sequentially ordered steps and required media to achieve intended results. Student learn how to work backwards with oil pastels, layering the colors and values and adding the finishing details last. In addition, students learn the importance of planning and creating an eye-catching composition. My students learn the difference between implied and tactile texture. We have a discussion about how artists can use implied texture to create the illusion of a 3D appearance on a 2D surface. This is also a great lesson to introduce the principle of design, emphasis. In addition to the size of the eye, students learn how to create emphasis with contrasting textures, colors and shapes.
Follow Up Lessons
In addition to the oil pastel dragon eye, I have also created the polymer clay dragon eye and the digital dragon eye with my students. The clay dragon eye provides my students with creating actual or real texture after working so hard to create implied texture. It is almost like their dragon eye has come to life! Read my “How to Create Clay Dragon Eyes” post for more information.
The digital dragon eye is created with Google Drawings and it a great beginning digital art project. Students learn how to use a variety of tools such as: poly line tool, shape tool, gradients and layers all while working with one of their favorites subjects, dragons. My complete Digital Dragon Eye Lesson Plan is available here.
Thanks for Reading – Trista
Check out my Student Favorites Page for more posts like this.
If you liked this Dragon Eye art lesson post, please subscribe by clicking here.