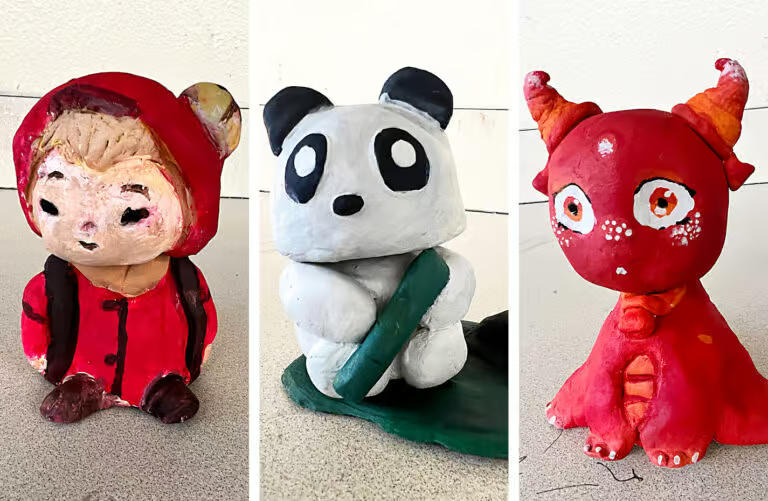
Here’s how I teach a clay bobblehead art lesson and why my students love it. Students love this lesson because it gives them the creative freedom to create a sculpture that relates to them and is something they want to keep. My students have created everything from Bob Ross to Minecraft ducks. The freedom of the subject matter is always a win when it comes to student favorites. Besides the open-ended nature of the lesson, students love working with clay and making 3-dimensional artwork. Many of my students lack clay experience, yet all seem to have a successful outcome with this lesson.
What the Students Learn
I pack this lesson with a lot of clay vocabulary and procedures so if it is the only clay lesson students will do, they will learn the basics of clay. Students also learn how to use creative problem solving, come up with a subject matter that interests them and decide how to execute their drawing into a 3D form. In addition, students learn how to use acrylic paint, mix colors, use painting techniques to create textures and paint from an underpainting to detail work.

Getting Started
I often begin this lesson by showing my students an ‘Introduction to Clay’ powerpoint presentation. The presentation covers different types of clay, hand-building techniques, stages of clay, clay tools and clay procedures. The students demonstrate their understanding by completing a crossword puzzle that corresponds with the vocabulary in the presentation. This is a great way to make sure everyone is on the same page with their understanding of clay. I have a lot of tips on setting up for clay and other clay procedures in my blog post “How I Survive Clay Day: Tips and How to Teach Clay Art”.
How I Teach the Clay Bobblehead Art Lesson
This is a perfect lesson to review several types of clay hand building techniques. I have always taught this lesson with clay earthenware and fired the sculptures in a kiln. However, several art teachers have created bobblehead sculptures with air dry clay. A pinch pot is used as the base for the head of the figure. This is a great opportunity for me to make a pinch pot with students and review the clay procedures of keeping the walls and bottom of the bowl consistent when pinching. I use the term “pinkie check” and have the students use their pinkie as a measurement tool to make sure the walls do not exceed the width of their pinkie.
Next, we revisit the concept of using slip and score to attach two piece of clay together. Finally students create a conical shape for the body. The top of the cone should fit into the head. Arms, legs, and tails are attached to the conical body. I encourage my students to use additive and subtractive techniques to their clay sculptures. Finally, students use a loop tool or another clay tool to make the cone hollow and do another “pinkie check” to make sure the base is not too thick. I prefer to use acrylic paint to finish these adorable sculptures. This allows students to mix colors and create realistic textures that are not possible with glaze.
My complete Clay Bobblehead lesson plan is available here.
Thanks for reading – Trista
Check out my Student Favorites Page for more posts like this.
If you liked this clay bobblehead art lesson post, please subscribe by clicking here.
Related Post: 5 Fun Ceramics Art Lesson Ideas
Related Post: How I Survive Clay Day
Related Post: How to Make A Pinch Pot