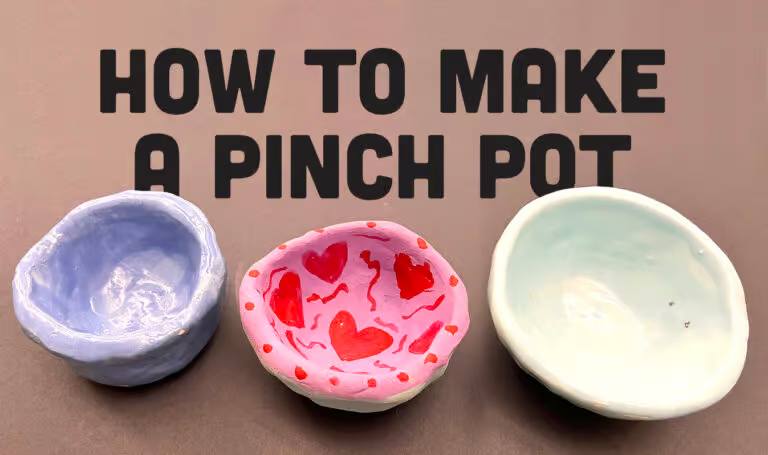
The first step in clay art is learning how to make a pinch pot. As a veteran art teacher, over the years I have assisted and taught my students to make thousands of pinch pots. I have taught every grade and have made a pinch pot with almost every student. In my opinion, the pinch pot is a fundamental part of art. In this article, I will explain how to make a pinch pot and why it is a necessary skill.
How to Make a Pinch Pot
When I teach my young students to make a pinch pot, I use a lot of humor and funny terms to get them to remember each step. The first step in making a pinch pot is BALL. I remind them not to over handle the clay because their hot hands dry out the clay quickly. This can cause cracking during construction. The next step is BELLY BUTTON, silly name but effective. I show them how they can use their thumb to make a hole in the middle of the ball without piercing through to make a donut.
Next, QUACKER, we use our thumb and four fingers to make a duck beak and quack. They put their thumb in the belly button and use their four fingers to squeeze the clay to make the walls thinner. I remind them to never pinch the clay with just one finger and thumb. This will cause the clay to become too thin. After they have made the walls of the pot they should stretch their fingers to the very bottom of the pot to make sure it is also the same thickness.
Supporting the pot in the palm of their other hand, we do a BOTTOM CHECK. Forgetting to pinch the bottom is a common mistake and causes air bubbles to become trapped in the clay. This brings us to the next step, PINKY CHECK. Once the ball of clay looks more like a pot, use your pinkie finger as a measuring tool. The wall thickness should be consistent, and their pinkie is the perfect measurement tool! Now to make sure the pot has an even lip, they gently tap the top to make it smooth and flat. TAP, TAP, TAP, not smack or smash – I quickly explain the difference and talk about slowly and gently tapping the clay pot. We also tap the bottom of the pot 3 times to make sure it will stand and not roll off the table!
Final Steps
Lastly, SMOOTH! I provide my students with a little slip and sponges cut into small cubes. They use these to carefully rub away any cracks, fingerprints or fingernail marks. I show my students these steps using my YouTube tutorial below.
Afterward I have my students recite the steps back to me prior to passing out the clay. I write the key words on the board (or make a poster) and we call out the steps as we are working. BALL, BELLY BUTTON, QUACKER, BOTTOM CHECK, PINKY CHECK, TAP, TAP, TAP, SMOOTH. I have made thousands of pinch pots with my kiddos this way, and we have been successful every time!
Why is the Pinch Pot so Important?
The pinch pot is the base and foundation for many other clay sculptures. I teach many lessons that build on the pinch pot concept. It can be the base of a coil pot when learning about coil pottery. I also have students add a long coil to the top of a pinch pot make a functional cupcake sculpture. Students can also learn about attaching clay with slip and score to make a pinch pot funny face or learn how to attach 2 pinch pots together to make a hollow form for a sculpture, such as a Clay Dragon. I have created 6 lessons for Kindergarten to 5th grade which all incorporate a pinch pot and other handbuilding skills. These six introductory pinchpot clay lessons are available here.

Who Should Make a Pinch Pot?
I took an adult pottery class several years ago. Guess what we created for our first project… a pinch pot. However, this is also the perfect Kindergarten lesson too. It is doesn’t require any extra tools or materials. It is also a perfect lesson for beginning middle school and high school art classes. Using the pinch pot as a clay introduction lesson is a great way to familiarize your students with the basics of clay, such as clay thickness, wedging, bone dry clay, bisqueware and glazeware.
One of my favorite middle school clay lessons is the Clay Bobblehead. It begins with a basic pinch pot and then allows students to take it to another level with their creativity and hand-building skills. Click here for more information about my Clay Bobblehead lesson plan.
For More Information
I know clay can be daunting, especially for a new teacher. I hope these tips and tricks make your next pinch pot lessons a success. For more information about distributing clay, storage and coding projects, scope and sequence and other clay procedures, read my blog “How I Survive Clay Day: Tips on How to Teach Clay Art”.
As always, thanks for reading and HAVE FUN, Trista
If you liked this How to Make A Pinch Pot post, please subscribe by clicking here.
Check out my How To Page for more posts like this.
Related Post: How I Survive Clay Day