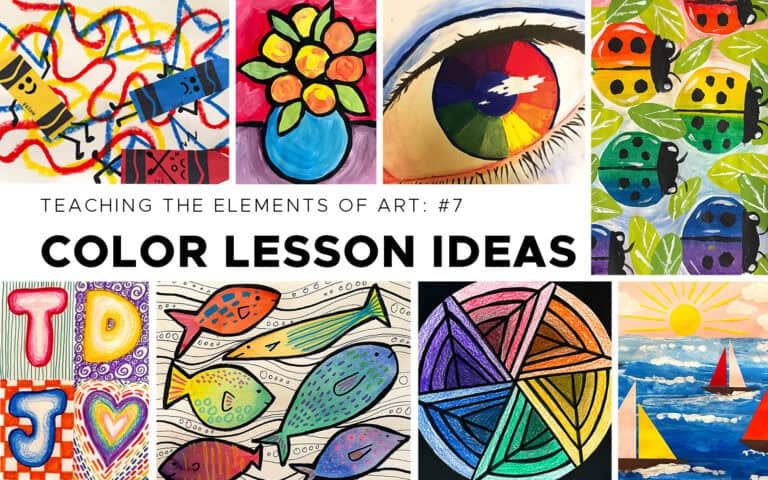
These color art lesson ideas are not only great ways to teach a fun element of art but are also budget-friendly lessons that use minimal art materials. Here are some of my favorite lessons that introduce students to the Element of art – color. Elementary lessons are first, with lessons for grades 5+ at the end.
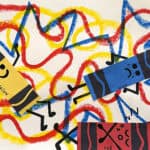
Primary Crayons
This is such a fun lesson for Kindergarten. A great combination of line, collage and teaching the primary colors. My students use paint sticks in primary colors to draw a variety of lines on drawing paper. Next, I provide students with rectangular paper pieces in the primary colors. I demonstrate how to cut the top of the rectangle to make a pointed crayon or round the corners to create the illusion of a used crayon. After gluing the crayons to the paper, my students use paper scraps and markers to add details to the crayons and arms, legs and faces to create expressive crayons.
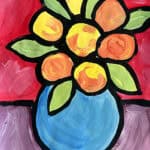
Secondary Flowers
I love this lesson to teach students how to make the secondary colors with the primary colors. Students mix the primary colors to create the secondary colors. After they have a palette with both primary and secondary colors, they use red, orange or yellow to create circular flowers in the middle of the paper. Next, they use green paint to add stems and leaves. They use blue or violet to create a vase for their bouquet of flowers. Students then add a table line to create the illusion of space and add color around the vase. They use the remaining colors to add color the table and the negative space around the flowers, using each of the primary and secondary colors. Lastly, they use black paint to outline the shapes in their painting.
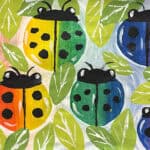
Analogous Ladybugs
This lesson is perfect for teaching students about analogous colors and why they matter when mixing and blending paint. Students use paint sticks to cover the entire paper in color-wheel order. Using analogous colors helps the colors transition smoothly without resulting in brown or muddy colors. Next, we use white paint to make large circles for the ladybugs’ bodies and fill the rest of the paper with white. Green is added to create leaves in the negative space. Finally, black paint is used for the heads, eyes, antennae, wings, and dots, and we add white highlights as a finishing touch. My young artists are always proud of their results.
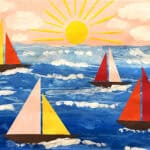
Warm and Cool Boats
I love this collage lesson. We begin with pink paper and the students mix tints of blue to create waves of water. We use cards or cardboard to scrape the paint to create waves of water. Next, students stamp a yellow circle above the horizon to create a sun. Then, they use white to create the clouds and white surf. Finally, I provide my students with scraps of construction paper in warm colors and they cut triangles in a variety of sizes to create sail boats. I use this lesson to help make a connection to colors that feel warm or cool.
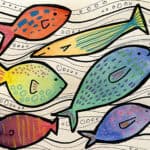
Tertiary Fish
This watercolor lesson is a great way for students to learn how to make tertiary or intermediate colors. My students draw six large ovals for each of the tertiary colors. They fill the oval with water and then add a drop of color on each end to make the intermediate color. For example, the red-orange fish will have a drop of red on one end and orange on the other end. Red-orange will be created in the middle where the two colors meet and mix. After the paint has dried, students add details with Sharpie markers and paint pens to add patterns to the fish.

Complementary Initials
My intermediate artists love learning creative lettering, so I created a lesson that requires my students to use complementary colors to create their initials. After I demonstrate how to create bubble letters, my artists practice writing their initials with bubble letters. Students divide their papers into fourths and write a letter in each space. If they have an extra space they draw a shape of their choice. Next, we use colored pencils to shade the letters to create a 3D appearance. With a marker in the complementary color, my students add a pattern of lines to the negative space around the letter. All six colors are used in the 4th box, to remind them the color wheel can be a useful tool to identify the complementary colors.
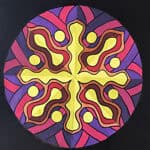
Monochromatic Op Art
This lesson is best suited for upper elementary students, as Op Art requires more precision. I demonstrate how to divide a circle into six pieces and how to add lines inside each section to create an optical illusion. The primary and secondary colors are used to add tints and shades to each section. I demonstrate how to use pressure and layer white and black colored pencils to create a variety of values of one color. The final result is eye catching and provides my students with some basic color pencil techniques.

Neutral Shapes
This is a great mixed media lesson. I provide students with paper scraps in a variety of neutral colors. I remind my artists the neutral colors are colors that are not found of the color wheel. They cut a variety of organic and geometric shapes from the paper and glue the shapes in columns on grey paper. Lastly, students use white paint to paint leaves over the shapes of paper. The results are simply beautiful.
All eight of the above ideas are included in my Elementary Color Art Lesson bundle, available here.

–
COLOR ART LESSON IDEAS FOR OLDER STUDENTS
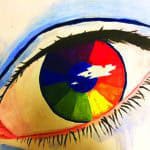
Color Wheel Eye
This is a great lesson to review color mixing with your middle school students. Students learn how to create the secondary and intermediate colors using ratios of the primary colors. They draw a large eye and include all of the important parts of an eye. Then, they draw an iris and divide it into 12 sections. Students apply their knowledge of color mixing to create a color wheel for the iris of the eye. The area around the eye can be painting with realistic skin tones or students may choose to use abstract colors. Lastly, they use markers to add line art, eyebrows and eyelashes. I love the variety of styles and artist interpretations this lesson can produce.
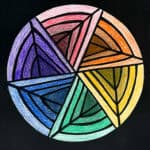
Radial Painting
This radial painting is a great way to teach radial balance as well as apply skills to create tints and shade of a color. My students fold a paper into eight sections. Within one section, they create a design using a combination of lines and shapes. A light table is used to transfer the design to the other seven sections to create a radial pattern. Next, my students choose a color scheme for their painting. They alternate tints and shades of the colors, to create four sections with tints of the color scheme and four sections with shades of the same colors. Sharpie markers are used to define the shapes and lines used to create the painting. The final painting creates an optical illusion.
Thanks for reading! – Trista
Check out my Elements of Art Lessons and Ideas Page for posts like this.
If you liked this Color Art Lessons post, please subscribe by clicking here.