These are my top 9 art room organization tips that are working for me right now. During my 26 years as an art teacher, I’ve learned many tricks to get more neat, clean and organized – my mother would be so impressed!
Let’s Talk About Tables
I have always used seating charts and I am a firm believer in seating charts. Each of my tables is labeled with a color. I place a giant circle sticker in the middle of each table to indicate the color and center of the table. When supplies are passed out, students are instructed to place the supplies on the circle to keep them in the middle of the table. This keeps supplies where everyone can reach them and eliminates hoarding.
I write a number with a Sharpie in each corner of the table (and yes, I have to write the numbers a few times during the year, as you can see in the photo). This number is used to quickly get a volunteer from each table. For example, number 1’s are getting supplies, number 4’s are using the brayer first, number 3’s are putting the folder away, the list goes on.

Lastly, I use “messy mats” as place mats with colors that coordinate with the table color. The table is always set when the next class arrives. Students know they should replace the “messy mat” if necessary. I have a replacement “messy mat” organizer on a table next to a basket of small papers. While the student is picking up a new ”messy mat” they may take paper to “free draw” with the remaining class time.
Drying Rack – Ending No Name Artwork
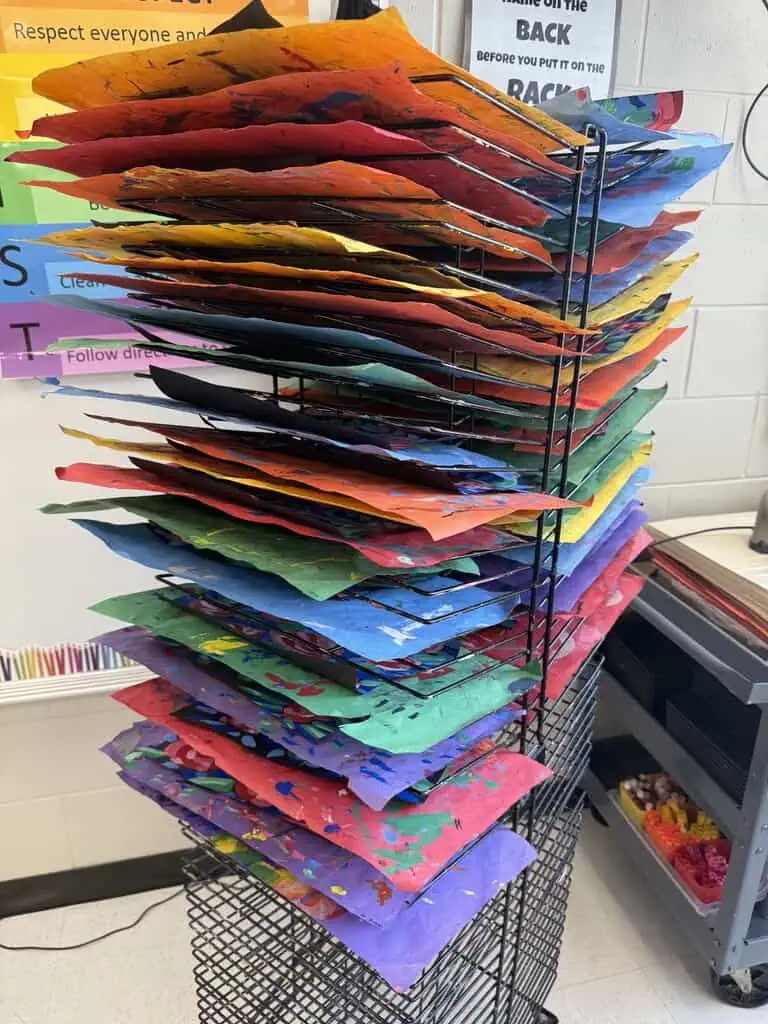
The “messy mats” also serve as trays to carry the artwork to the drying rack. The students place the artwork on the drying rack with the “messy mat” under it. When I unload the drying rack, I stack the like colors and place the artwork from that stack into the table folders. For example, I put all the artwork with green mats in the green table folder, etc. When the class returns, I quickly pass out the table folders while my helpers are getting supplies. Passing out papers is so quick and we never have to worry about “no name” papers because they work it out at their table. Dry artwork is placed in the table folder and placed in a basket at the end of class. Table folders are just a piece of construction paper folded in half.
Caddies, Trays, Baskets and Bins
I can’t live without my baskets, bins, caddies and most importantly TRAYS! I prep supplies before back-to-back classes with trays. Trays are great for paint distribution, collage or any mixed media lesson. I have everything on the tray ready to go, one student from each table gets the tray and within a minute everything is passed out and we are ready to create! I love using baskets for my glue and scissors containers, and I slide the paper or tracing templates in the black basket. The basket also works great to collect paper scraps as they are working, one student dumps the basket during clean up and they put the scissors and glue back in before returning the basket to the shelf.

Benefits of Binders
If you have used any of my lessons, I think I have a handout, step-by-step, photo reference or idea sheet for almost every lesson. I love to give choices to my students when creating art, to avoid “cookie cutter” art lessons. I have found these printable resources are key so I have a binder for each table loaded with plastic sheet protectors. It is a ritual of mine to swap out and add to the binder at the end of each lesson. Bonus, my early finishers are encouraged to look in the binder and use the step-by-step pages for their “free draw” time.
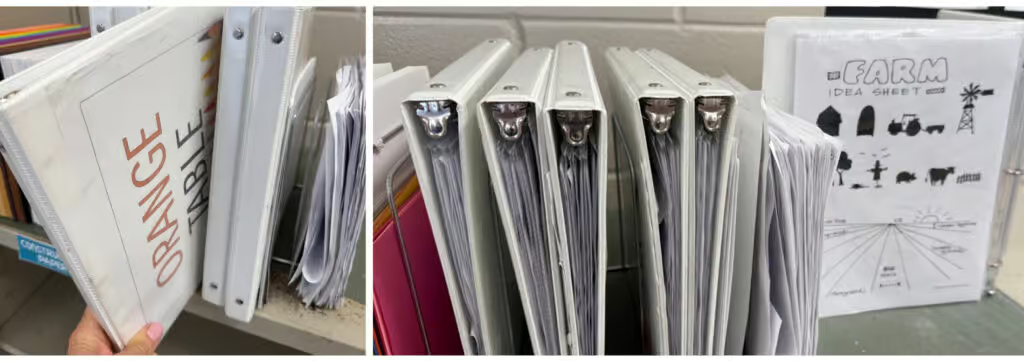
I label the binders with the table color, mostly for accountability. If one binder is left, I can say “Where is my helper from the “green” team?”.
The Upright Paper Storage Solution

I like to keep my paper (and all supplies for that matter) accessible for my students. I label everything, so students know where to find and return supplies. When possible, I allow my students to select the color of the construction paper they will use in their artwork. To make the line moving quickly, I stack the paper vertically in a paper organizer so they can easily grab and go. Stacking paper vertically rather than horizontally in my cabinets makes it easier to get, rather than lifting a heavy stack of papers to get the color on the bottom. Book ends work great to keep the papers upright. I also use baskets for strips of paper or other specialty paper we are using.
Paint Storage Hacks
Where to start…there are so many things. Tempera cakes and watercolors need to dry completely between uses. I made this black storage rack, with a cube organization system another teacher discarded. I used clips to make shelves, so the paint can dry and I can conserve precious counter space. The paper organizers also come in handy to store watercolor trays. Again giving them space to dry without taking up counter space.
I also found these cupcake trays at a dollar store, which work great for tempera cakes. They can be stacked to allow air flow while drying (see photo) and collapse when the tempera cakes are dry. I use disposable cups or muffin liners to easily remove or exchange colors in my tempera cake trays. The disposable cups also work great for liquid paint. I add the cups of liquid tempera to the tempera cake trays or place them on the trays I mentioned earlier.
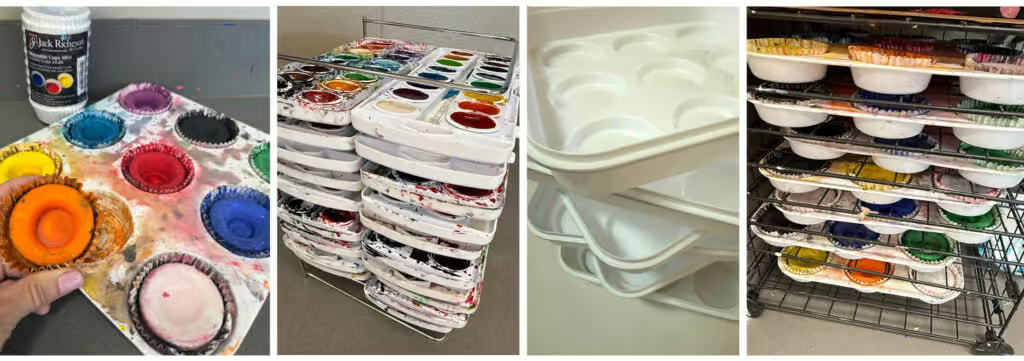
If using liquid paint day to day, place cups of paint in an air tight container or storage box. Liquid paint will last for weeks! It depends on the lesson, but I have used egg cartons, paper trays from the lunch room, disposable plates, magazines, honestly anything that can be repurposed or is disposable. Personally, I just don’t have enough time to wash palettes on a daily basis or with each class.
Storing All That Artwork
I use legal size file folders to create a “class folder” to store the table folders loaded with the current art lesson and my demonstration artwork. I write the teacher’s name on the front of the folder, store it in a legal size file cabinet, and use hanging folders labeled with the teacher’s name. My favorite part about using the file cabinet is the ability to squish the artwork by adjusting the sliding piece in the file cabinet to keep files close together and to flatten painted paper that wants to curl. I’ve used plastic storage bins when I didn’t have the file cabinet. However, I always check with the custodians or put out an email to see if anyone has things like this they are not using.
Each morning, I use a vertical paper organizer to store “class folders” for the day in the order I will see my classes. I will place the “class folder” in the basket I collect table folders. If the class has artwork on the drying rack, I place the “class folder” on the drying rack to serve as a divider between classes. This is especially helpful if the classes are working on the same lesson.
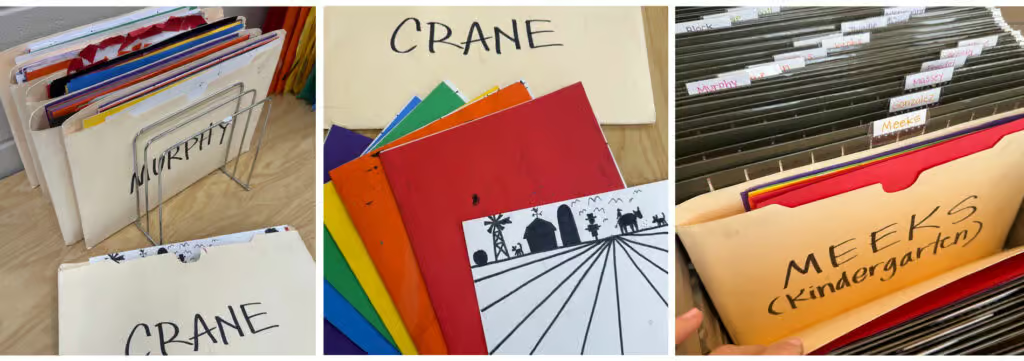
In addition, I have my students write a class code with their name on the back of their paper. For example, 2C is the code for Ms. Crane’s 2nd grade class. If students have artwork displayed, I can use the code to easily locate the class folder and slip inside to return to the student once the art display is taken down.
File it for Later!
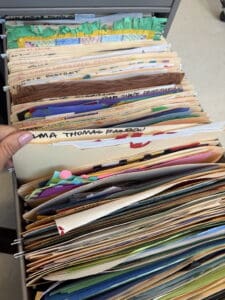
I use the same file cabinet to store my teacher examples, handouts, tracing templates or specialty papers for each lesson. I like to have examples of the various stages of a lesson, as well as a variety of different outcomes of the lesson. Each lesson has a folder and I store them by grade level with hanging folders. The folders help me with lesson planning too.
Clean Up Made Easy
I set a timer as the students enter my classroom (it is magnetic and is literally on my door frame). The students know when the timer rings, they are to stop working and begin cleaning up. It is a contest to see which table group can be cleaned up, table set and waiting quietly in their seats.
I reward the first table ready to go with stickers. As the students are working and clean up is approaching, I explain clean up procedures. For example, dump the paper scraps from the basket, place the tempera trays on the shelves, dump the water, brushes handle up in the cup, table folders in the basket, set the table, use the “messy mat” as a tray when carrying your painting to the drying rack. I always remind them, even if they know it or they should know what to do.
As always, thanks for reading, Trista
If you liked this Art Room Organization post, please subscribe by clicking here.
Check out my How To Page for more posts like this.