Here’s how I teach a Neurographic art lesson and why I think my students enjoy it.
Why Students Love Neurographic Art
This artwork allows students to become relaxed, calm and enter a meditative state. I have noticed this lesson reduces stress and creates an overall sense of well-being. I find that my students especially enjoy it during stressful times, such as exam week or testing season. Although, any time of year, they enjoy the relaxation that comes with creating art with no planning or necessary subject matter. The results are positive and the lesson requires no previous art experience. Neurographic art can also be taught to students of all ages.

Why Teach It
The main objective of this lesson is to teach students that art can be an outlet and a way for us to calm down, reduce stress and become more mindful of our actions. I encourage my students to embrace the freedom of the exercise and go with the flow. It is a great way to encourage balance in our lives and education.
Watercolor Techniques I Cover
I also take advantage of this opportunity to share watercolor techniques with my students. I demonstrate several watercolor techniques such as: wet-on-wet technique, using salt for texture, lifting the color with paper towel, tapping, flicking and splattering color. Students are expected to try at least one or more of the many techniques demonstrated.
In addition, I review analogous colors and discuss color theory. For example, how neighbors mix together well, while colors across the color wheel may result in brown and muted colors. Lastly, I teach students the difference between abstract and non-objective artwork. Students learn the definition of both and identify abstract and non-objective artwork in a series of slides that I show them during class discussion.
How I Teach the Neurographic Art Lesson
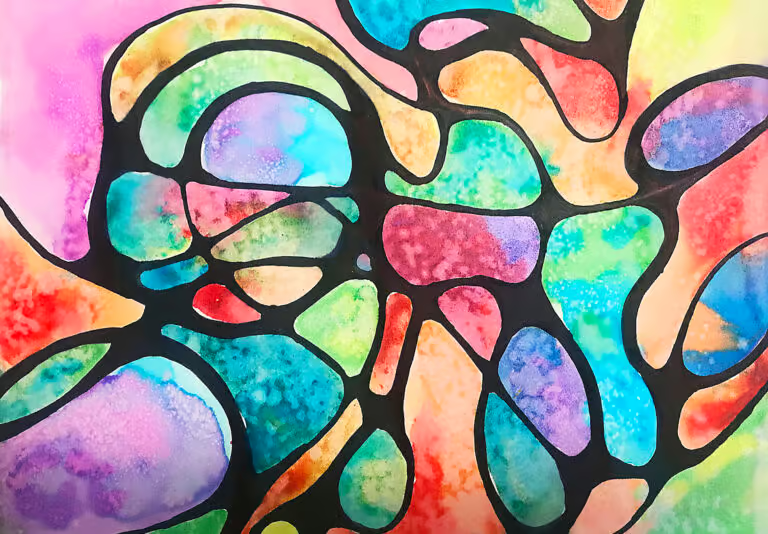
My students draw directly on the watercolor paper with a fine Sharpie. They draw lines from one side of the paper to the other. I encourage the lines to wiggle and bend. The line should be long and continuous and it should intersect. The lines should be kept soft and curvy rather than rigid or angular. (My video tutorial of this process is below.)
The more lines drawn, the more shapes that are created. Next, students draw about three rounded soft shapes over the intersecting lines. These shapes can be organic and free-form shapes or recognizable objects, it is the decision of the artist. Next, students use a chisel tip marker to add a dot to all the intersections they find. Using an ultra-fine Sharpie the students round these intersections to make round corners. The result is a very soft, kind and gentle appearance.
Students then add color to each shape that was created with the overlapping lines. I demonstrate using a wet-on-wet technique and how to mix two analogous colors together. I also encourage students to create a color scheme with neighboring shapes to create contrast. Students also enjoy adding a pinch of salt to the wet puddles of the watercolors to create texture.
Click here for more information on my Neurographic Watercolors Lesson Plan.
Stay calm and art on, Trista
Check out my Student Favorites Page for more posts like this.
If you liked this Neurographic Art Lesson post, please subscribe by clicking here.