Here are some tips and tricks to teach acetate portraits. Students enjoy this art project because the end results look like them and it builds self-confidence. They also like the additional background painting because it is open to creative problem solving and exposure to a variety of mediums.
What are Acetate Portraits?
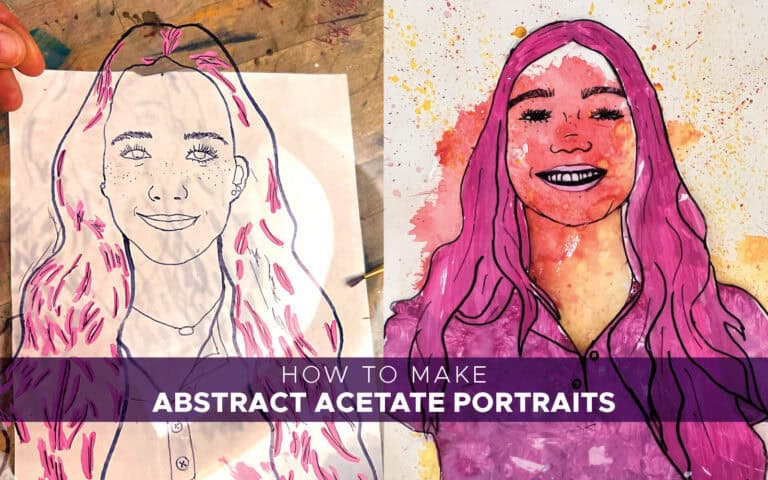
An acetate portrait is an artwork created on a transparent sheet of plastic film. The term typically refers to a technique where an existing photographic portrait is traced onto the acetate and then embellished with paint.
Materials Needed
This lesson does require acetate, also known as transparency film. Amazon sells a package of 50 letter size sheets for about $14. Search for “acetate sheets” or “transparency film”. Due to the slick quality of the material, I use acrylic paint and permanent marker for the acetate. I have also purchased washi tape to create a creative frame when combining the acetate portrait and the background image. I use cardstock or watercolor paper for the background image.
Transferring the Image
I take photos of my students and print the images large enough to fill a piece of copy paper. I have recently learned I can print these images on the copy machine and save toner in my printer (which I must purchase). Ask your tech person for assistance to see if you can print to your copy machine, especially if you need to use art budget funds to buy toner like me.
Once the images are printed, students align and tape the portrait with the bottom of a sheet of acetate. I suggest my students use an ultra-fine Sharpie to outline facial features. We also talk about implied lines and how it is not necessary to draw hard outlines for the nose. Lastly, I ask them to use the fine point Sharpie to draw the hair, shirt and neckline. I personally like a combination of line qualities, such as ultra fine point for stitching or to draw fine strands of directional hair within the hair shape. A little helpful tip, we found hand sanitizer and Q-tips work great for erasing lines that you are not satisfied with.
Painting the Portraits
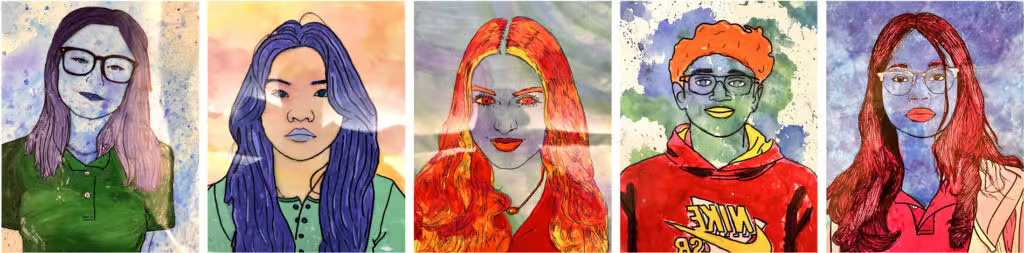
I have taught this lesson many times in a variety of ways. As an abstract self-portrait art lesson, students choose a color scheme to add color to their portrait. For example, if they chose warm colors, they would paint the hair, eyes, lips, and shirt only using warm colors. The skin area remains clear and the colorful background shows through. Another option is to paint the portrait with realistic colors. The easiest way to paint the portraits is to use flat, solid colors. However, you can layer colors to create highlights and shadows. This is a bit more advanced, as it requires the students to think backwards, starting with the highlights and painting the shadow and darker tones last. All the painting should be done on the opposite side of the Sharpie drawing. Lastly, I suggest my students paint a second coat if the colors are transparent or add a layer of opaque white paint to prevent seeing the background painting through the portrait.
Creating the Background
I provide my students with a variety of options for the background. I have used collage and mixed media, such as cutting words and images from magazines and gluing them to create a colorful and autobiographical background. My students have also created non-objective paintings with watercolors, using techniques like wet-on-wet, salt, splatter and lifting paint. Lastly, we use old credit cards or pieces of cardboard to scrape acrylic paint across the paper and create bold non-objective paintings in a contrasting color.
My Complete Acetate Portrait Lesson Plan is available here.
Thanks for Reading, Trista
If you liked this How to Teach Acetate Art post, please subscribe by clicking here.
Check out my How To Page for more posts like this.