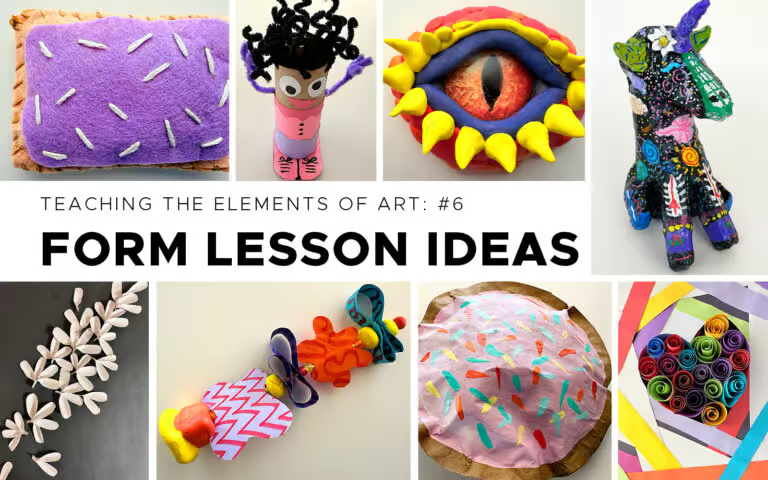
My favorite form Art lesson ideas are sculpture lessons, which my students always get excited for. Yes, ceramic lessons can be fun, but not all art teachers have the storage or access to a kiln. These are some of my favorite non-earthenware clay sculpture lessons that introduce students to the Element of art – form. Elementary lessons are first, with lessons for grades 5+ at the end.
Cookie Sculpture
This is such a fun sculpture lesson for kindergarten or first grade. Students trace a circle template on a folded piece of 12” x 18” Kraft paper. Then they cut the circle while the paper is still folded to get two identical circles. Next, students use liquid glue is used to trace around the edge of the cookie, leaving a gap so the cookie can later be stuffed. I suggest leaving a pair of scissors on the circle as a reminder to stop and start one either side of the scissors to leave a gap.
The top is painted with pink paint to create the frosting. Once the paint is dry, students can use paint pens, markers, crayons, oil pastels, cut paper sprinkles or stamp sprinkles on the cookie. When the glue is dry, my students crumple strips of newspaper and push them inside the cookie. Once the cookie is stuffed, the opening is glued closed. They are so proud of their GIANT cookie sculpture.

Skewer Sculpture
This is another fun sculpture for young artists. My students use Model Magic to create a clay base and beads for the sculpture. They used paper scraps and a hole punch to thread paper on the skewer. In addition, identical shapes can be glued on either side of the skewer like a sandwich. My students had a blast threading a variety of clay and pony beads as well as paper on their tall whimsical sculptures.
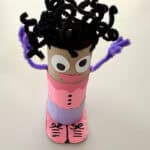
Tube Person
This is a fun, creative problem solving lesson for young artists. Students use construction paper and markers to create the face and body of a person on a paper tube. A paper punch is used to add holes to the top of the tube and pipe cleaners are threaded through the holes to create hair. Pipe cleaners are also added to create the arms and hands. Lastly, a small piece of cardboard is glued to the bottom of the tube to create a base and feet for the tube person.
Paper Boat
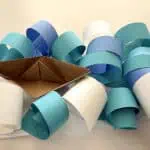
My students really enjoy learning about origami and the art or paper folding. In this lesson, students fold paper step-by-step together to create a paper boat. Next, my students wrap strips of blue paper around a pencil to make spirals. The spiraled paper is glued to a piece of paper to create waves, and the boat (or boats) are glued into the sea of waves.
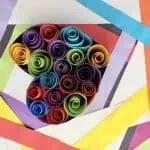
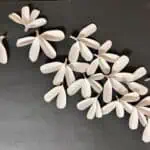
Coil Heart
This is the perfect lesson to introduce relief sculpture. It includes the same spirals of paper as the Paper Boat art lesson. Prior to creating the spirals, a folded and cut strip of paper is glued down to the paper to create the shape of a heart. The shape is filled with spirals in a variety of colors. The negative space around the heart can be filled with paper scraps or left a solid color. This is also a great introduction to paper folding techniques.

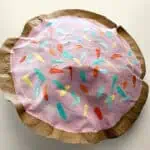
Clay Sundae
This is such a fun sculpture lesson for my older elementary artists. My students use Model Magic in primary colors and mix the colors to make their ice cream flavor. They take a sheet of aluminum foil and gently crumple it into a ball. The clay they used for the ice cream should be roughly the same size as the foil ball. Next, they flatten the ball into a large circle that is large enough to cover the foil ball. Then the “ice cream” is placed into a clear plastic cup. I mix liquid Elmers’s glue with brown tempera paint to make “hot fudge”. My students add toppings of their choice to their sundae, including the “hot fudge”. I buy plastic cherries and sprinkles on Amazon that they put on last. The finished sculptures look good enough to eat!
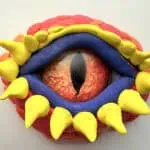
Clay Dragon Eye
This is another student favorite Model Magic sculpture lesson. Students choose an eye cabochon (bought on Amazon) and stick it to a clay pancake slightly larger than the eye. Next, they use a coil to add an eye lid on the top and bottom of the eye. They roll small beads, cones and other forms to create scales and eye lashes around the eye. I always recommend a color scheme to add unity to the glass eye cabochon. Lastly, I spray the sculptures with a 50/50 Mod Podge solution to seal the finished sculptures. Magnets may be added to the back of the relief sculptures if desired.
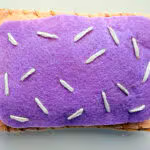
Stitched Pop Tart
This sewing sculpture lesson is perfect for students with more patience. My students choose a felt pieces for the frosting of their pop tart. They cut the frosting piece smaller than the two crust pieces and round the corners. Next, the frosting is stitched to one of the crust pieces with long random single stitches to resemble sprinkles. Next, a baseball stitch or basic stitch is used to sew the two crust pieces of felt together. A small gap is left to stuff the Pop Tart with cotton balls or Polyfill stuffing. The gap is sewn closed to finish their Pop Tart stuffy.
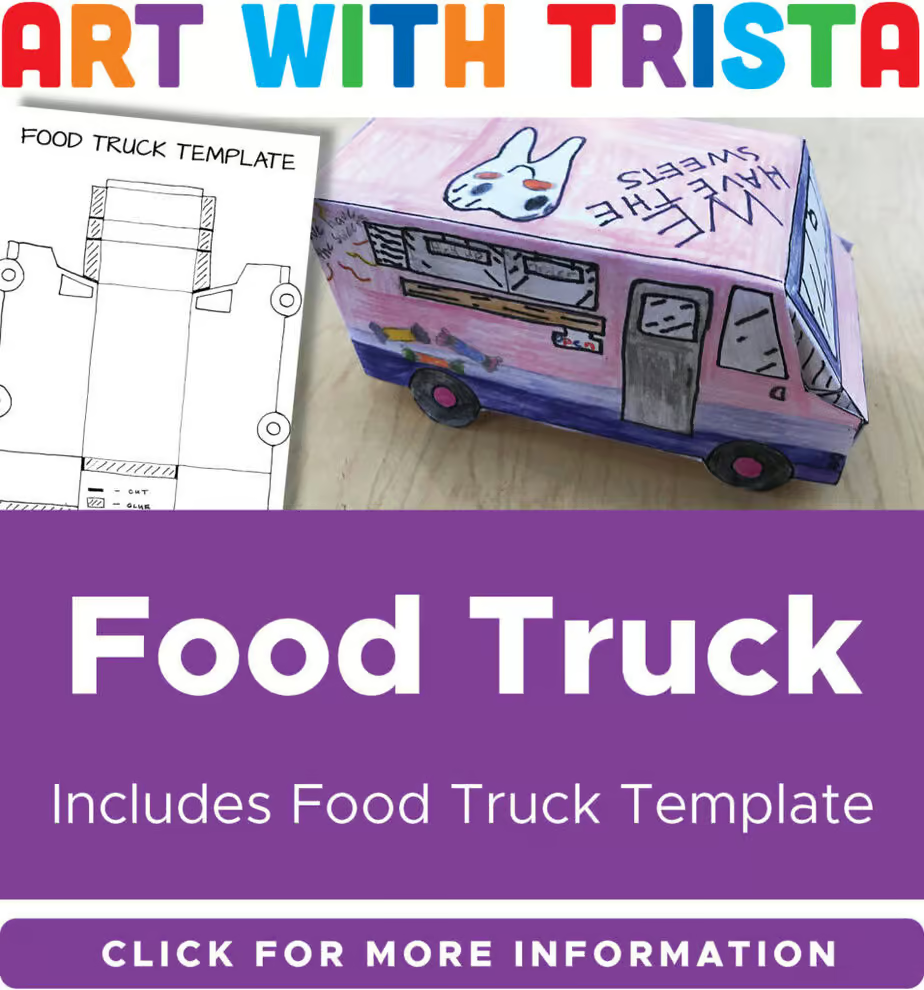
All eight of the above ideas are included in my Elementary Form Art Lesson bundle, available here.

–
FORM ART LESSON IDEAS FOR OLDER STUDENTS
50 Forms Paper Sculptures
This is my favorite introduction to paper folding and relief sculpture for middle school students. We look at a variety of paper folding techniques and simple origami forms. Students use small pieces of paper to create 50 of the same form. They can choose to use a variety in color or size, but the form itself should remain the same. Lastly, we review the Principles of Design and students decide how they will arrange their 50 forms to create an interesting composition. The students learn about Mademoiselle Maurice and the Legend of 1000 origami cranes along the way. Check out my 50 Forms art lesson here.
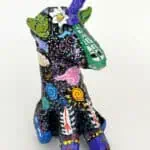
Alebrije Animals
These imaginary fantasy-like creatures are so fun to create. My students cut pieces of pool noodles and connect the pieces with tape and wooden skewers. They cover the armature with plaster gauze and finish the sculpture with painted patterns just like the Oaxaca use when they created their wooden Alejbrije sculptures. This lesson is perfect for Hispanic Heritage Month or any time of the year. Middle school students love the creativity and excited by problem-solving aspect in this lesson. Alebrije Animals Lesson available here.
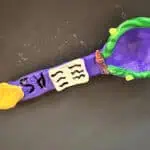
Totem Spoon
This is a fun lesson to use during the month of November when studying American Indian culture and traditions. Students create a clay spoon form with a very small pinch pot and coil for the handle. Next, they sculpt 3D forms to attach to the handle of the spoon. The additional forms should be autobiographical and represent things about themselves and their culture. The final clay sculpture is painted or glazed. Students learn about the significance of totem poles and the symbolism used when creating them. Check out my Totem Spoon lesson here.
It is important to teach students about the Element of Art – Form and the options are endless. These are just a few of the possibilities you can use to teach a variety of sculpture techniques to students.
Thanks for reading! – Trista
Check out my Elements of Art Lessons and Ideas Page for posts like this.
Related Posts:
Non-Clay Sculpture Lessons: 10 Sculpture Ideas Without Clay
How to Teach the Elements of Art
If you liked this Form Art Lessons post, please subscribe by clicking here.