I created this culture jars art lesson for an ‘Art and World Cultures’ class, and continue to use it in art classes because it is so well received. This lesson is the perfect way to showcase each individual students’ celebrations, traditional food and meals, customs and beliefs. Here’s how I teach and display it.
Lesson Objective
The outcome of this lesson allows students to tell a story about themselves by including both tangible and non-tangible items. Students also learn about cultural heritage and how important our heritage can be in shaping who we are and our identity. Lastly, students learn how to create the illusion of form and space by including highlights and shadows on the jar and within the jar. They also show depth by drawing the items to appear as if they were placed into the jar and overlap one another.
How I Teach the Culture Jar Art Lesson
I introduce the lesson by asking my students to define cultural heritage. Many of them do not really understand what it is exactly. We have discussions about what traditions, beliefs, activities or objects have special meaning to their families as a whole, not just them individually. I show some student examples from this lesson and students define tangible and intangible and create a list of personal examples of both. Next, I teach students how to draw a jar using an ellipse. I also provide jar templates for time’s sake or for the consistency of the mural.
Then I demonstrate to my students how to begin drawing items at the bottom of the jar first and overlap the next object. I explain scale is not a factor in this and that items should be drawn fairly large to fill the jar. Students add shadows and highlights to the objects to add to the illusion of depth as well as fill the negative space with a dark grey value. Lastly, I encourage the students to add their name to the jar in a creative way. For example, a tag glued to the lid, a piece of tape placed on the jar, or by creating the illusion that the letters are inside the jar.

Why I Love It
I always get an overwhelming response when I teach this lesson, because it is the perfect way for schools and teachers to celebrate every individual student. Many teachers begin the year with an “About me” activity, but this is different. Students have to dig a little deeper and get a bit more personal to share the customs and beliefs of their present and past. Many teachers and counselors have used this activity to teach a lesson on inclusion and heritage, as well as use it for a family night at your school.
How to Display It

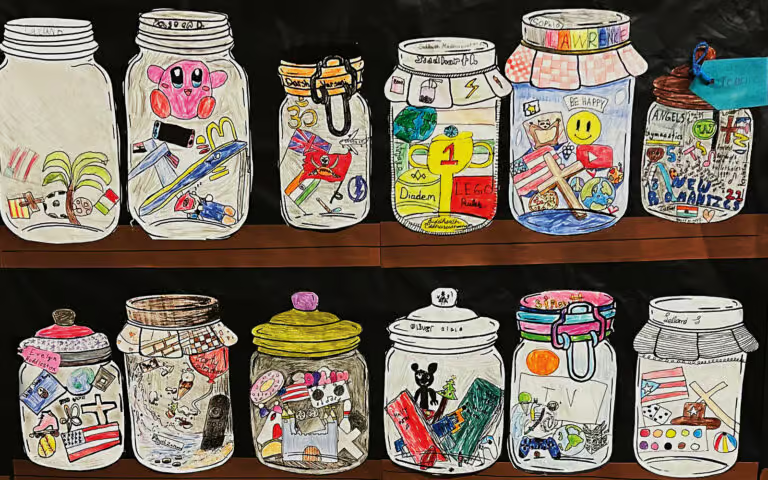
I use large pieces of black butcher paper and glue 2” X 18” brown construction paper to create the illusion of wooden shelves. Then, I have the students fill in the negative space of their jars with black or grey to show the transparency of the jars against the black background. I hang several sheets of the butcher paper full of aligning shelves on a wall to create a mural of jars. The outcome is so beautiful.
When the jars are complete and on display in our school, I remind my students to take pride in their cultural heritage, because it really is a special part of who they are. I explain that the jar represents a safe place to keep these tangible and intangible items so they can be preserved forever.
My complete Culture Jars Lesson Plan is available here.
Enjoy the lesson, Trista
If you liked this culture jars art lesson post, please subscribe by clicking here.