With Halloween being one my students’ favorite times of year, I am always coming up with new Halloween art ideas. I have taught Halloween lessons including cute monsters, witches, haunted houses, spooky cats and pumpkins all while still teaching students new art vocabulary or introducing them to new art techniques. Here are some of my favorites. Elementary ideas are first with lesson ideas for older students at the end.

Candy Corn Mosaic
This lesson is perfect for beginning artists. Students use strips of yellow, white and orange construction paper and tear them into small pieces. They cover the candy corn template with the three colors to resemble a candy corn. Either the student or I cut out the candy corn template and glue it to a colorful background. Lastly, the students add a funny face to the candy corn as well as arms and feet. The results are so fun, and the students practice cutting and gluing. This is a perfect skill builder for kindergarten artists.

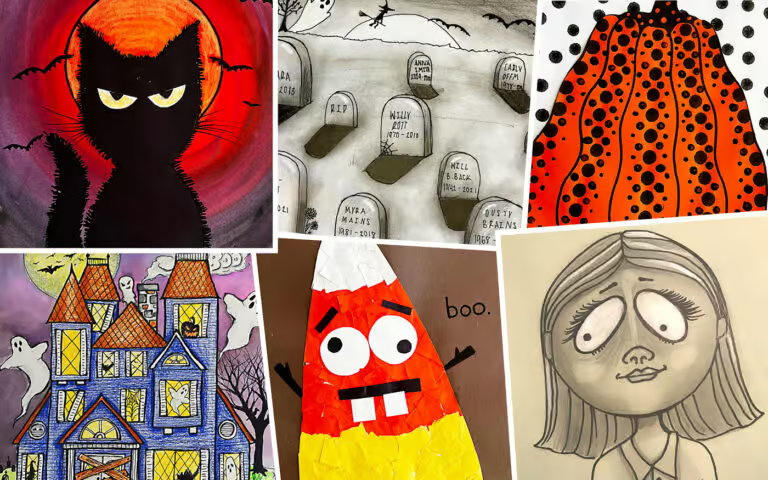
Spooky Cat Painting
This painting lesson is one of my favorite Halloween art ideas. Students draw a full moon towards the top of the paper and paint it yellow. Next, they paint the sky using a radial motion around the moon with red, purple and blue to create a spooky night sky. Students draw and cut out a black cat from construction paper and add it to the painting once it is dry. I have students use yellow construction paper to make the eyes. Lastly, students use Sharpie to add pupils to the eyes, bats flying in the sky and hair to their spooky cat.

Kusama Pattern Painting
My students use a step-by-step handout to draw the pumpkin or follow along with me to draw a pumpkin like Yayoi Kusama. The pumpkin can be drawn on orange or colorful construction paper. Students use a variety of pencil erasers, Q-tips, paintbrush handles and pencil points to make dots of many sizes. Students stamp the dots carefully in rows of small, medium and large. Then they cut the pumpkin from the paper. Finally, students glue a black rectangle to the bottom of a white piece of paper and glue the pumpkin on top to resemble a table or similar surface. Larger dots are stamped in the negative space in a random fashion to contrast with the precise lines of dots in the pumpkin. Yayoi Kusama is always a hit with students and they love the outcome of this whimsical painting.

Haunted House Landscape
This mixed media collage is perfect for older students. Students trace a small paper plate on yellow paper for a full moon. Next, students draw a silhouette of a haunted house towards the bottom of the circle. Then they use Sharpie markers to fill in the house with black, leaving the glowing yellow windows. The circle is cut out and students create a texture rubbing with green crayons to create a grass texture. A curved line is drawn and cut to resemble a hill. The hill is placed on the bottom of the paper and the moon is tucked behind the hill. Lastly, students use white paper to create ghosts and headstones to their landscape. A great lesson to teach space and texture!

Zentangles Pumpkin
Students draw a pumpkin and outline it with a fine point Sharpie. Then they outline the segments with washable orange markers. Next, we use a wet paintbrush to saturate each section and allow the color to bleed and fill in the area. This technique creates the illusion of highlights and shadows on the pumpkin. When the paper is dry, students fill each section with Zentangles or simple patterns. To create the illusion of a table or surface, students add a line to the bottom of the paper. The wall and surface are also filled with patterns to create contrast. This is always a favorite with my older students, and they find the Zentangle patterns to be relaxing to create.

Paper Weaving Monster
I cut a 12″ x 18″ paper in half lengthwise. I prepare the “looms” by cutting long slots in the paper. Next, my students use colorful strips of paper to create a long weaving. After they complete the weaving, the weft pieces are glued in place and triangles are cut from the strips to create a spiky texture. Lastly, students cut out eyes, mouth, arms, legs and a tail from construction paper to create a monster. My students love the outcome of their silly monster.

Paper Pumpkin Sculpture
I love this simple sculpture lesson. It is a great follow up to the Kusama pumpkin painting. Students glue long strips of paper to make two large X’s. The X’s are glued together like a “+” and an “x” combined. Students use markers or daubers to make dots on the strips of paper then glue the ends of the paper together to create a sphere. Lastly, they fold a green strip of paper like an accordion and add it to the middle to look like a stem. This simple sculpture can be done in one class period if time permits.
Complete lesson plans for the all the elementary lessons above are all included in my K-5 Halloween Art Lesson Bundle.
Halloween Art Lesson Ideas for Grades 5 and up

Perspective Cemetery
Students draw a horizon at the top of the paper. They draw 2D headstones or as I call them upside down “U”s across the paper. The headstones closest to the bottom are larger and they get smaller as they get closer to the horizon line. Students use a vanishing point on the horizon line to connect to the top and bottom of the headstones to show the depth of the headstone and create a cast shadow. A drawing pencil is used to shade the cast shadow, the sides of headstones, ground, and the sky with a variety of values. Then students use an eraser is to create a bright white moon and add highlights to the top of the headstones. Lastly, they use a Sharpie to add silhouettes of bats, trees, cats, and other spooky details as well as inscriptions on the headstones. A great middle school lesson to teach perspective and value. My full Perspective Cemetery lesson is available here.

Chalk Skeleton
I use close up photos of different parts of the skeleton, such as the backbone or rib cage. I print several of these images to use as references for this drawing. My students study the positive and negative shapes they see to replicate the photo. After they outline the pencil drawing with Sharpie, they use soft chalk pastels to add value to the bones. They use a light, medium and dark value of any color to create the appearance of 3D bones. Students use their fingers to smudge the chalk to create a smooth texture. Lastly, they choose one color to fill the negative space. As a class we review colors that create contrast and they apply that knowledge to their artwork. We use aerosol hair spray to fix the chalk. The results are stunning. My Skeleton Drawing lesson plan is available here.
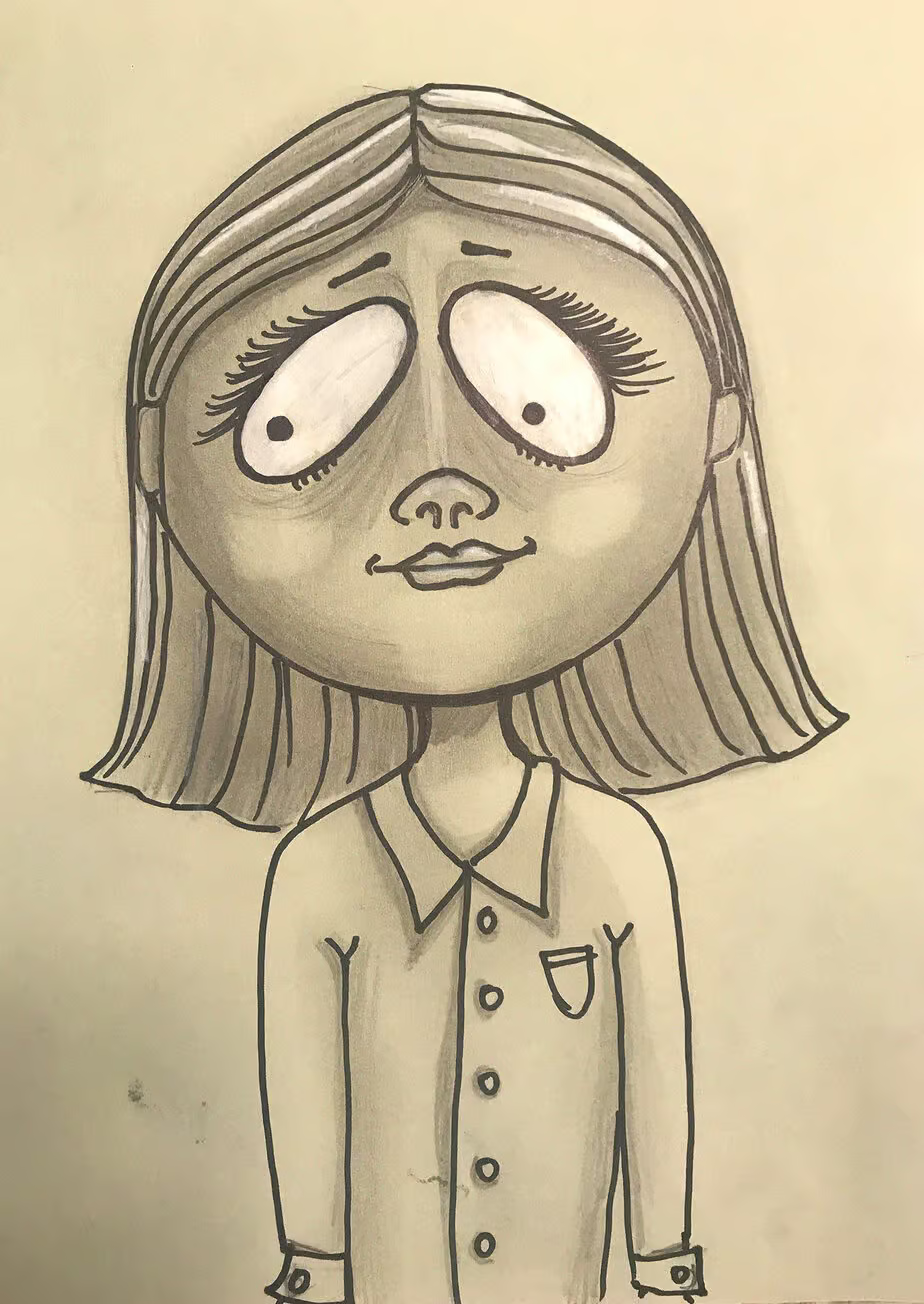
Spooky Selfie
When my students draw their spooky selfies, I use my “Tim Burton Inspired Selfies” ideas handouts for inspiration. They use it when selecting eyes, noses, and mouths. The handout also provides ideas for hair styles and head shapes. I encourage my students to add something interesting on their shirt and background. Once my students have had time to practice blending and sketching ideas, they begin the final drawing. The final drawing includes white colored pencils for the eyes and highlights, as well as Sharpie markers to create bold outlines and contrast. This is always their favorite lesson of the year! The complete Spooky Selfies lesson plan is available here.
I hope these Halloween art ideas will spark a little extra joy in your lesson planning for October. Happy Halloween, Trista
Related: My Fall Art Lesson Ideas post has many other art lesson ideas like this.
Check out my Seasonal Lesson Ideas for more posts like this.
If you liked this Halloween Art Ideas post, please subscribe by clicking here.